| Wireless Inventory software |
|
What is a wireless inventory system?Conventional inventory systems are installed on desktops but the people working in warehouses and selling goods are in constant motion. They should give information about all their operations in the office where the information is entered into the computer. But you can significantly accelerate the integration of all warehousing and sales information if you install our inventory system with a mobile extension. This system allows you to enter information from any mobile device connected to the network via wireless internet or Wi-Fi. Warehouse workers will record the receipt of goods directly to a warehouse using a handheld computer or a wireless scanner. Your sellers will write invoices or orders directly from customers using your cell phone. You can significantly speed up the inventory of your warehouse if your employee will conduct a physical account using a wireless scanner or PDA.How to work our wireless inventory system?Our system consists of three parts:
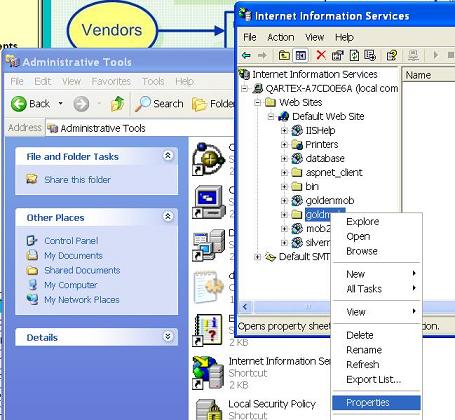
How to install our wireless inventory system in your company?First of all you have to organize a wireless network in your company. It is usually done using a wireless router with Wi-Fi function. You will be able to have wire and wireless connections in your local network. Define a computer used as a server.Then, you have to download and install our Golden Web Inventory System or Golden Inventory System . They are almost identical system but Golden Web Inventory System better works with remote databases. If you use Windows XP check whether you have Microsoft .NET Framework 2.0 (or later) on your computer. Use the Windows menu Start-Control Panel-Add or Remove programs.  If you do not find this framework download it from Microsoft and install on your computer. Windows Vista and 7 has this framework. You have to install the IIS web server on your computer. To install IIS, add optional components, or remove optional components
You can read more about the IIS installation at the Microsoft site Create two new folders C:\Inetpub\database\ and C:\Inetpub\wwwroot\goldmob\ and place in this folder our Mobile extention files. Then, run Golden Inventory System and create a new database with the menu File-New Database File.
Select the folder "C:\Inetpub\database" and enter the file name "Invent". After that, you can find the database file invent.idb in the folder C:\Inetpub\database. Then use the menu File-Security and add several users with passwords. You can define access rights for each user. Now,you have to set permissions for the new folders.
The database file invent.idb doesn't have sufficient security permissions or write permissions to be modified when updating data in it. The web browser is seen by the web server as a Internet User that has the server account IUSR. This user needs to have write permission to the database file and to the database folder. Follow these steps to resolve this issue:
 Now, you can check your web application. open Internet explorer and enter the address http://localhost/goldmob/ you will see the login page of Golden inventory system. You have to set exceptions in your firewall for IIS and go to this web page from wireless device using an address like http://192.168.0.2/goldmob You should use the IP address of your server computer. If you are interested in our wireless inventory system, please send us a request and we will send you a link to our demo web site. We welcome your questions about Inventory Systems |

How to work with the Golden Inventory System from a mobile device?First, you have to connect to the web application from device's web browser. You can create a bookmark. Then enter your user name and password. Select the link Enter and click the soft key OK.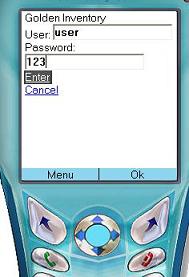 You'll see the main menu of the mobile extention. Each user has its own set of available functions, which is defined on the panel "Security" of the Golden Inventory System. 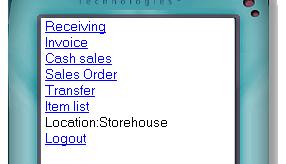 For example, we've selected Receiving ad click OK. You'll see the field Enter Vendor. If you believe that the vendor has already been registered in your system, type a few letters from its name and click the link "Find Vendor"  You'll see a vendor list and select the right supplier.  Now you can begin to fill out a new item receipt. Click the link "Create Receipt"  You'll see the form "Enter Bar code/Name". If you are using a device with a built-in bar code scanner you can scan a barcode label and system will search this product in the item list. 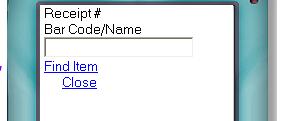 If this is a new product you will be able to enter its name and weight.  If the product is found the inventory system will prompt you for the quantity,purchase price and serial #.  Click the link Enter and the system will create a new Item Receipt with this item. 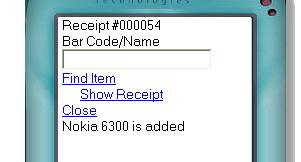 From this moment you can see the new Item Receipt on the main computer in Golden Inventory System. You can click the link "Show Receipt" and view this receipt on mobile device.  If you use a device without a bar code scanner you can enter a few letters from the item's name and click the link "Find Item". The inventory system will prompt you to select a list of items.  Select the desired item and press the soft key OK.Then, enter quantity and price and press the link Enter. After filling the receipts click the link Close and and go back to main menu. Wireless Invoice from BlackBerry smartphone and physical count on mobile device |
| © 2002-2010 Quartex, inventory Software for business Inventory-system.com best software for home and office Site map |